Building a Low Cost OPNSense Firewall/Router That Rivals Commercial Units at a Fraction of the Price
Are you getting what you pay for from your ISP? Many people with advertised connection speeds exceeding 1Gbps are getting less than what they pay for and don’t even realize it.
ISP-provided consumer network hardware is often limited in both features and performance. It is fairly common for these devices to be unable to achieve their full advertised speeds except under narrow and sometimes unreasonable circumstances.
In my case, the particular device my ISP provided was only equipped with gigabit LAN ports and could not achieve the full 1.5Gbps offered by my internet service provider over a single port. This means that despite paying for a 1.5Gbps connection, the maximum speed I could effectively hope for over a single wired connection was 1Gbps! One way to address this problem would be to use link aggregation to combine two or more network interfaces for increased bandwidth. However, the ISP-provided device unsurprisingly did not seem to have this feature. The manufacturer of my particular device or my ISP might argue that it is able to achieve those speeds over WiFi to support their advertised speeds, but this is unrealistic in an urban environment where there are many neighboring access points causing wireless interference.

I was able to achieve a speed of 927Mbps over a wired connection. This is fairly fast, but finding a way to achieve the full 1.5Gbps would be a 50% increase in performance, so I decided to build my own router.

The fiber service provided by my ISP is delivered using an SFP optical transceiver. I already happened to have a number of ultra small form factor (USFF) PCs equipped with 2.5Gbps networking, but these devices only have a single ethernet interface and no SFP port.
This left me with a limited number of options if I wanted to use one of these PCs as a router, as no matter how I chose to approach this problem, I’d have to connect the SFP module to the USFF PC somehow. There are a few possibilities for doing this, but I made the observation that multigigabit switches have recently become a lot less expensive. A multigig switch could provide both the necessary SFP interface and a number of 2.5Gbps ethernet ports.
This lead me to try a network configuration often used in embedded routing devices: a router on a stick.
Router on a Stick
A router on a stick is essentially a physical network configuration in which the router uses a single physical network interface to route traffic between two or more networks. In my case, the router would be routing traffic between the internet and my internal private networks.
This is possible through the use of VLAN tagging, in which each network packet is tagged with an ID number that identifies which network it originated from. Traffic originating from the WAN port on the switch is assigned a different VLAN tag than traffic originating from the LAN ports. This allows the firewall to distinguish between internet (WAN) and local (LAN) traffic despite both sharing a single physical interface.
Hardware
I used an Ouvislite GK3V ultra small form factor PC and a Mokerlink 2G05110GSM managed switch for this project.
-
Ouvislite GK3V USFF PC
- Intel J1425
- 8 GB RAM
- 128GB SSD
- Intel i226 2.5GbE NIC
-
Mokerlink 2G05110GSM Switch
- 5x 2.5Gbps Ethernet ports
- 1x 10Gbps SFP port
- Layer 2 managed via a web interface
I happened to already have the USFF PC. The Mokerlink switch cost me a mere $56 (CAD). I also used a USB ethernet adaptor during setup to create a separate interface for configuring the firewall. This isn’t strictly needed, but it helps prevent accidental lockouts during setup.
Software
I used OPNsense for this project. OPNSense is a free, open source firewall/router platform based on M0n0wall that has built in features comparable with expensive commercial firewalls. It is extremely flexible and is compatible with most regular PC hardware.
Installing OPNSense is similar to installing other *nix like OSes, but it is a good idea to have every network interface you plan on using connected to the system during installation (including any USB ones) as the installer may prompt you to assign them. When assigning interfaces, I chose to assign my USB NIC to LAN. This allowed me to plug a laptop into the LAN NIC with a patch cable and begin configuration right away. This would also be a good time to change the default root password.
Configuration Overview
I configured both the switch and firewall with VLANs for my LANs and the WAN interface. My ISP uses PPPoE and requires that the packets be tagged with VLAN 40. The PPPoE configuration will only briefly be discussed here as it is already described in the excellent official OPNSense documentation.

Switch configuration
My ISP requires that WAN traffic be tagged with VLAN ID 40, so I decided upon VLAN ID 15 for my internal network. I configured the switch to assign ports 2-3 to VLAN 15 and made them untagged. I added the WAN interface (the SFP port) to VLAN 40 and set the port to only accept tagged traffic. Port 5, which is connected to the firewall, was made a member of both VLANs and set to tagged mode. I left port 1 in the default configuration, which allows me to plug a cable into that port to access the web interface of the switch.
| Port | PVID | Tagged/Untagged | VLAN Tag | Accept | Connected to |
|---|---|---|---|---|---|
| 1 | 1 | Untagged | Any | - | |
| 2-4 | 15 | Untagged | 15 | Untagged only | LAN Network |
| 5 | * | Tagged | 15,40 | Any | Firewall / Router |
| 6 (SFP) | 40 | Tagged | 40 | Tagged only | Fibre SFP module |
Firewall VLAN Configuration
In OPNSense, VLANs can be defined through the web interface. Navigate to the Interfaces > Devices and select “VLAN” from the menu. Clicking the “+” button will bring up a menu to add a VLAN.
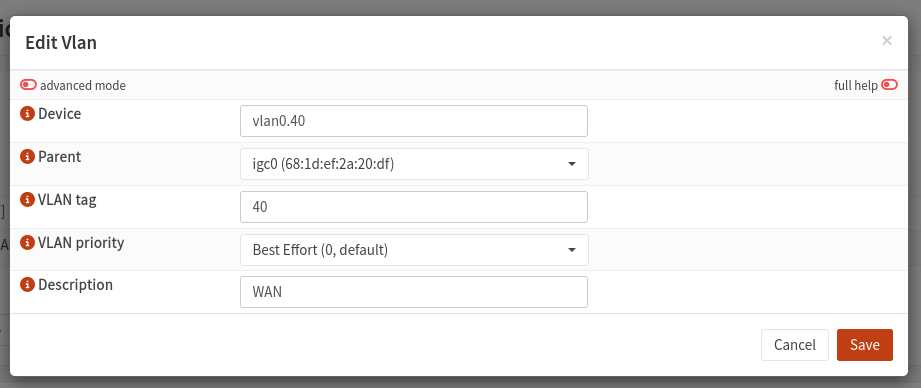
I defined two VLANs: VLAN 40 for my WAN and VLAN 15 for my LAN. I assigned the LAN_VLAN interface in Interfaces > Assignments (The parent interface should not be assigned). Then, I configured PPPoE as per the documentation and assigned the newly created PPPoE interface to PPPoE_WAN.
From this point on, the firewall can be configured as normal. I added some basic firewall rules, then chose to complete the setup by adding the Spamhaus DROP block list to my firewall.
Results
After a few tests, I was able to achieve a speed of 1187Mbps.

While this is a 26% improvement over the 930Mbps I measured earlier, it does fall short of the 1.5Gbps I was hoping for. It isn’t clear if this is an ISP-imposed limitation, the result of network congestion, a limitation of the servers used by speedtest.net, or some other issue such as packet fragmentation. There may still be some performance to be gained with a bit of tweaking, which I will explore later.
The firewall performed well during the tests. It barely reached 40% CPU utilization, even in a worst case scenario with a large number of firewall rules and hardware checksum offloading disabled. I am very pleased with the added performance and flexibility, even if I could possibly improve on the performance a bit. The added flexibility afforded to me by running OPNsense opens a lot of interesting possibilities. I could run an IPS or a VPN server on the firewall itself or use advanced firewall rules to control traffic between multiple VLANs, which are things that simply wouldn’t be possible with the ISP-provided device.
In any case, a 26% performance improvement with a total cost (to me) of $65 is a deal I’d take any day.